Part one explained how to choose a unique and distinctive mark. This part tries to guide you through the USPTO's trademark registration labyrinth, with some examples for technology and consumer products startups.
This website is not a substitute for hiring a lawyer. Statistically, the TM Office approves only 40% of applications filed by non-lawyers. In comparison, they approve 60% of trademark applications filed by experienced lawyers.1 If you’re going to apply anyway, gird yourself for a miserable user experience. You are about to engage with a government website. Ready? Go to the USPTO’s Trademark Application page.
0. Welcome to the TM Office
At the TM Application page, pick “TEAS Plus.”
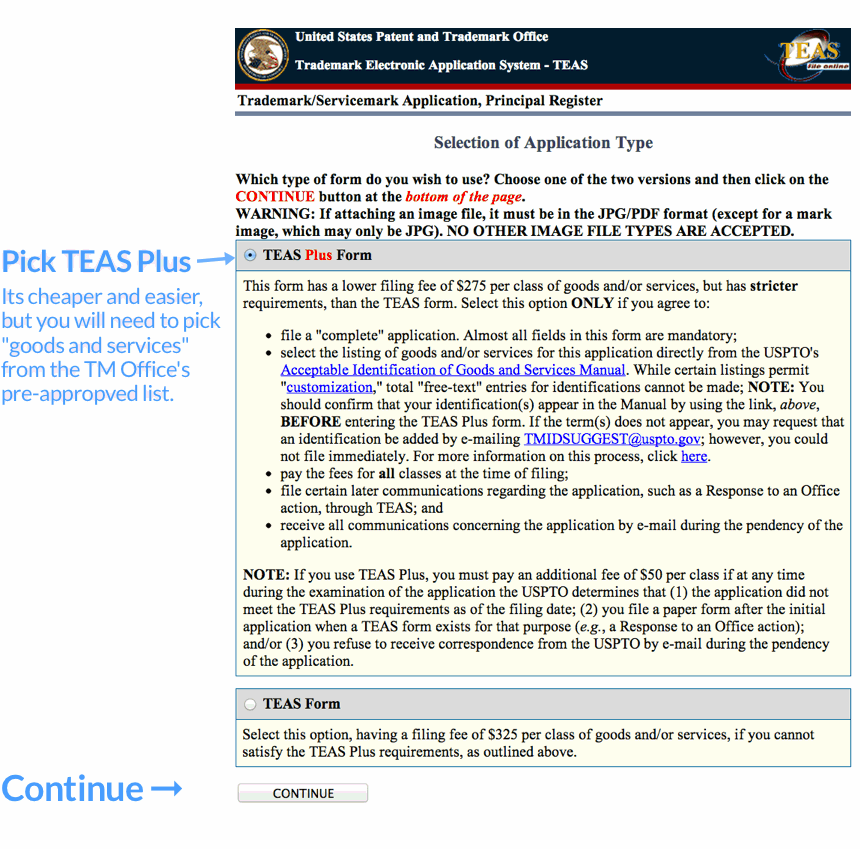
TEAS is some Trademark Office acronym. “TEAS Plus” is the version that saves you $50, but limits your options for describing your goods and services. Click continue, and prepare yourself for a second page of convoluted warnings and instructions.
1. Lawyer or DIY Application?
All you need to do on this page is pick whether an attorney is filling out the form or not.
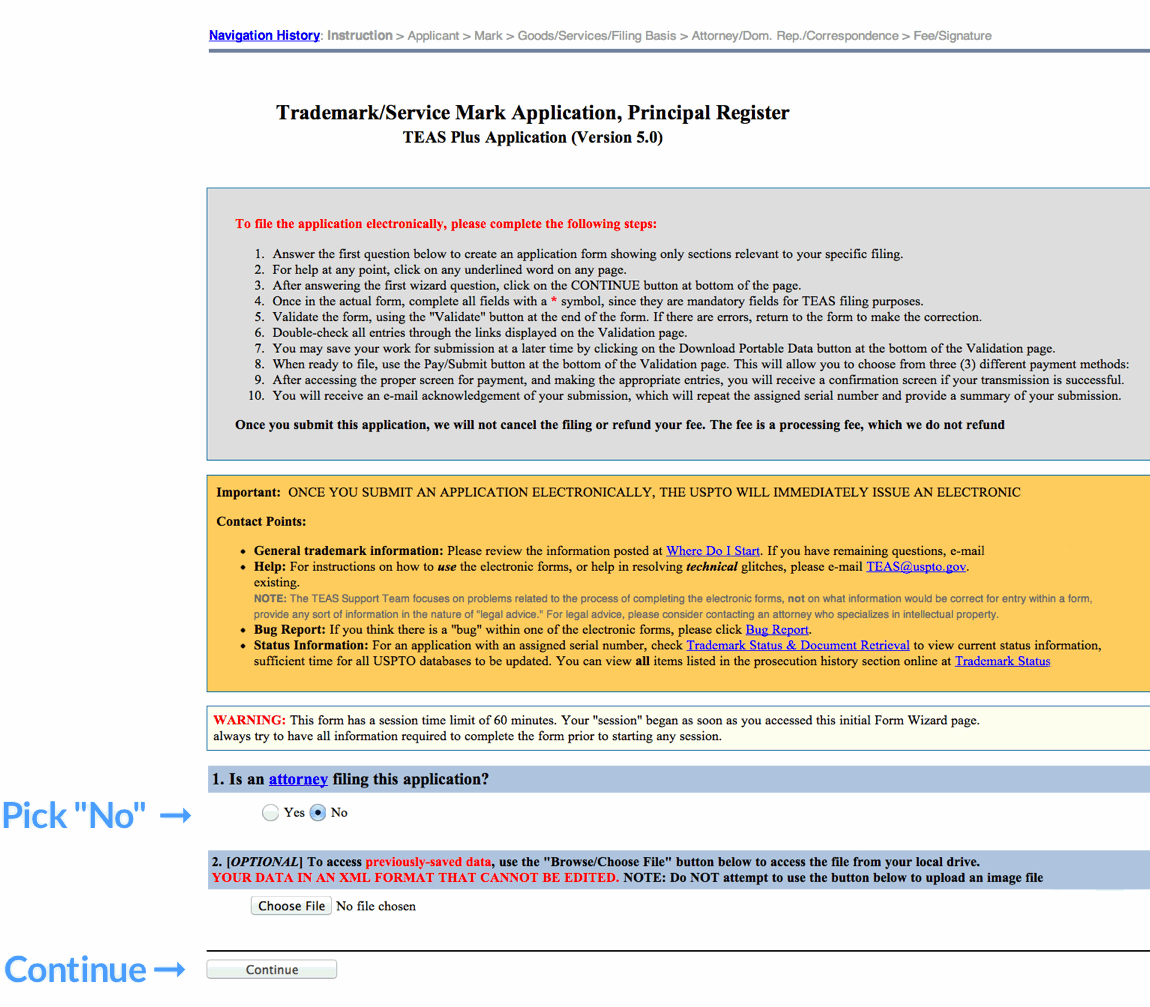
Time Limit. This form will self destruct in 60 minutes. You can save your work for later by clicking “download portable data” on the “validation” page at the very end of the process. In a UX catch 22, you can’t actually get to the “download portable data” page until after you finish filling out each previous page of the form. If you do manage to download your saved data, but can’t finish the form, you can upload your data again at this page.
Click continue, and you will see an ugly data entry form.
2. Trademark Owner
Here, you enter some info about the trademark owner. TMEP 1201 discusses the details of trademark ownership.
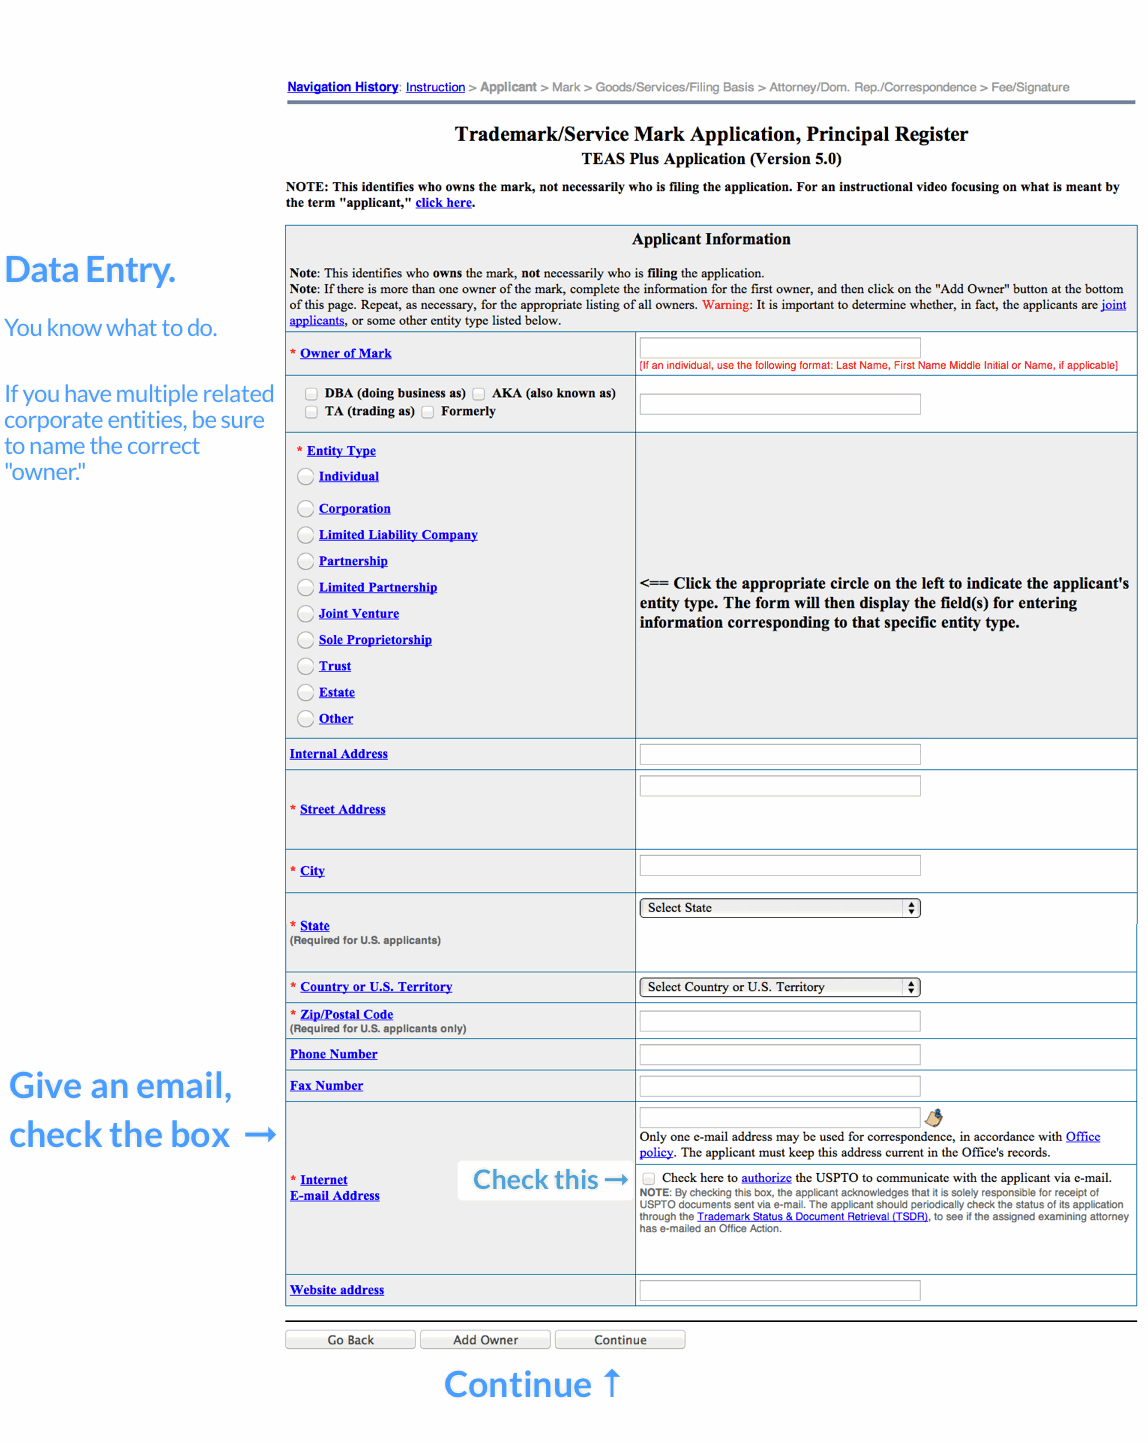
Be careful if the owner is a company that has parents, subsidiaries, or licensees. TMEP 1201.06 discusses special ownership situations.
Note that this page asked for info about the trademark owner. Later in the process, you will see a very similar form asking for info about the contact person.
3. The Trademark Itself
Trademark registrations can protect one of two types of marks, a “word mark” or a “design mark.” Here are two examples:
| Word Mark | Design Mark | |
| APPLE |  |
a design mark can be a logo |
| FED EX |  |
a design mark can be stylized text |
The plaintext word mark protects the word (or short phrase or slogan) in any font and in any color. The design mark protects a stylized version of a word, and can also protect a logo or design without any words. 2
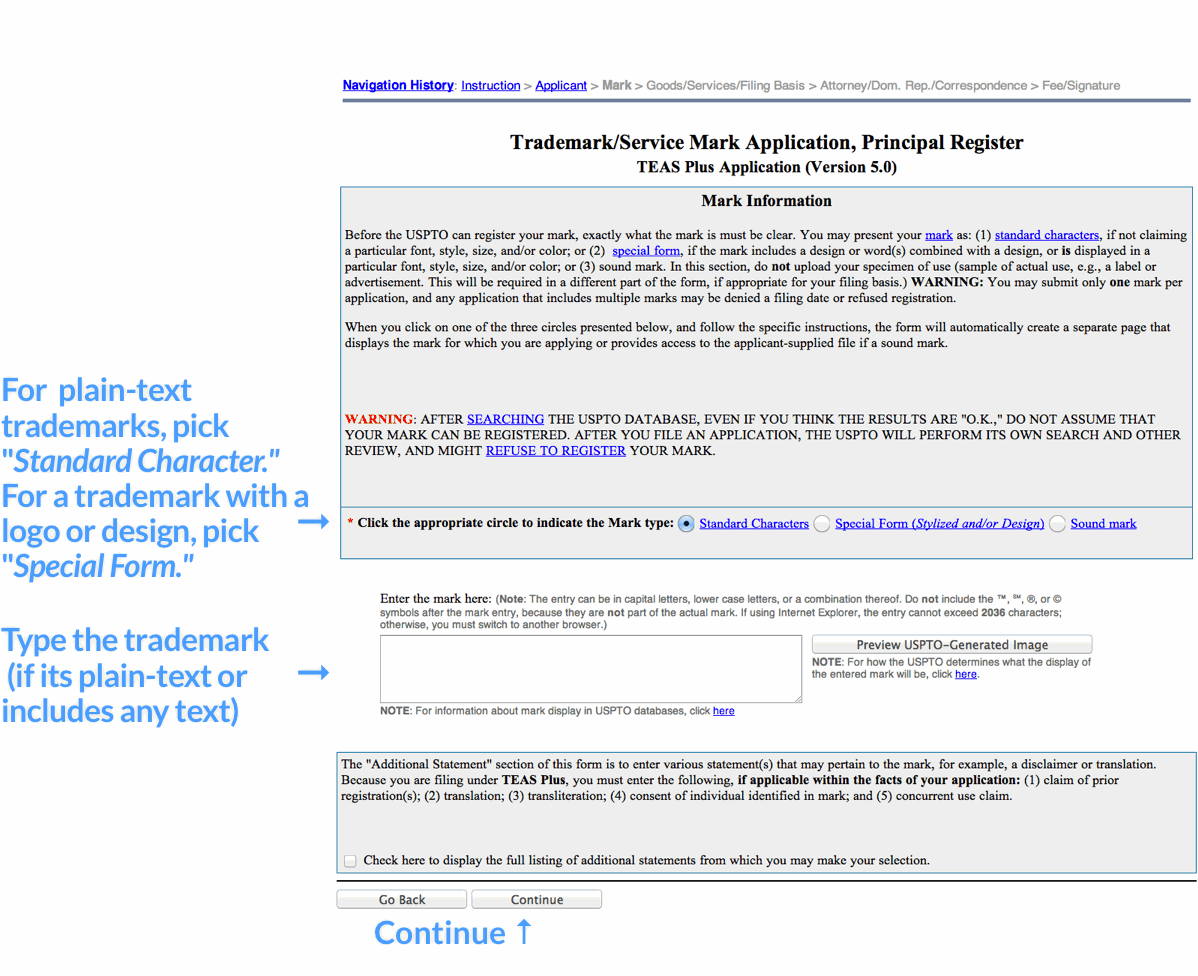
To register a plaintext word mark, pick “Standard Character.” Plain text trademark registrations provide stronger trademark rights, but are more likely to be rejected by office actions. Plain text registration are stronger because they protect your trademark in every font, every color, and in any design. Since they are broader rights, they are more likely to be rejected by the trademark office as being too similar to existing trademark registrations. To register a stylized word or logo, pick “Special Form.” You might want to apply for two separate trademark registrations - one for the plain-text words and another for the logo.
Pro tip: claim your logo as colorless even if it includes particular colors. Colorless actually means every color. If you claim a color, your registration is limited to that particular color. A “special form” trademark should be easier to register, but the resulting trademark rights are less extensive than the plain-text option. If you pick “special form”, you will be asked to upload a .jpg of your trademark.
4. Adding Goods and Services
Over the next several steps, you will be describing your goods or services. Click “Add Goods/Services.” This will take us to a separate page for finding and selecting the goods and services.
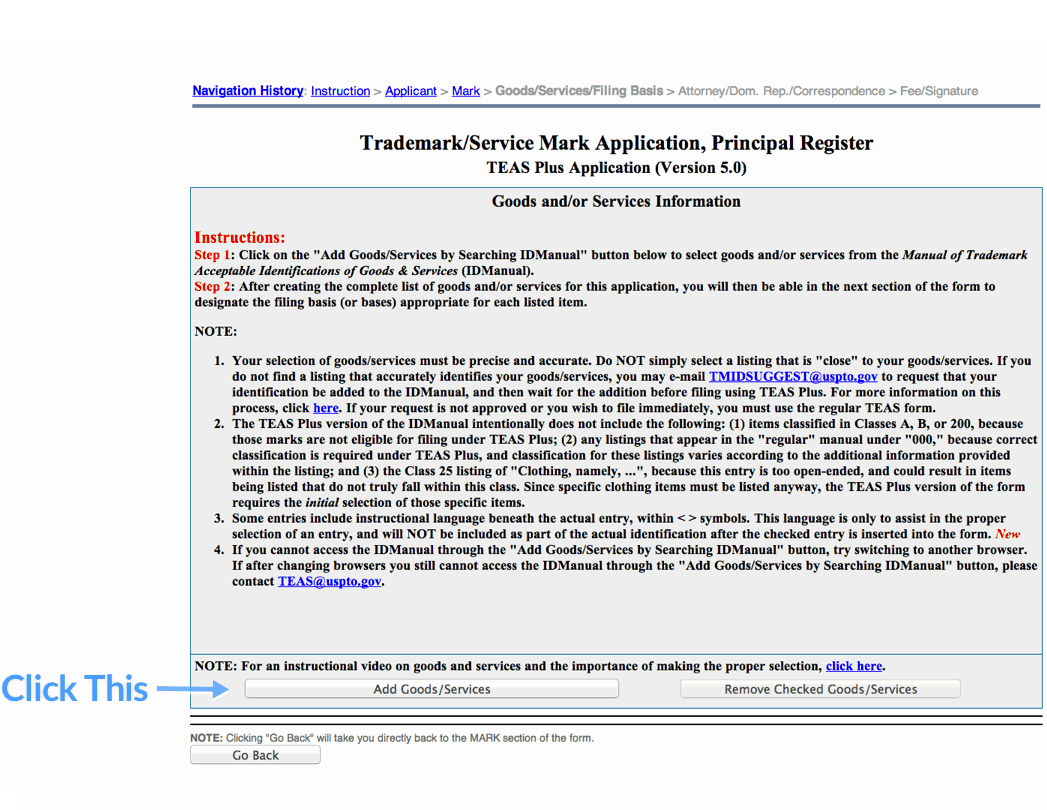
TMEP 1402 discusses the details of how to properly identify your goods and services. A “TEAS” application lets you describe your goods in your own words. A “TEAS Plus” application, what we are working on here, requires you to select a description of your goods from a pre-approved list.
5. Searching for Goods and Services
Now we’re at a search box. This box lets us query the list list of pre-approved descriptions of goods and services.

Describing your goods and services is tricky. If the description is too broad, it can void your trademark. If it’s too narrow you may have trouble stopping infringers. If you can’t find an accurate description of your goods in the list of pre-approved descriptions, you should end this “TEAS Plus” application and start over with a “TEAS” application. The TEAS application will allow you to describe your goods and services in your own words.
Before searching, try to identify the “class” of goods and services applicable to your trademark. We are talking about the “International Class” here. The “International Class” system tries to categorize all possible goods and services into 45 classes.3 The class headings themselves can be misleading, so review the class details at TMEP 1401.02(a) Headings of International Trademark Classes.
Here are some of the classes that are most relevant to startups and makers.
| Class | GOODS |
|---|---|
| 3 | Cosmetics |
| 6 | Metal Goods |
| 7 | Machinery |
| 9 | Software, Electrical and Scientific |
| 10 | Medical Apparatus |
| 11 | Environmental Control Apparatus |
| 12 | Vehicles |
| 14 | Jewelry |
| 16 | Paper Goods and Printed Matter |
| 25 | Clothing |
| 28 | Toys and Sporting Goods |
| Class | SERVICES |
|---|---|
| 35 | Advertising and Business |
| 36 | Insurance and Financial |
| 38 | Communication |
| 39 | Transportation and Storage |
| 41 | Education and Entertainment |
| 42 | Computer, Scientific and Legal |
| 43 | Hotels and Restaurants |
| 44 | Medical, Beauty and Agricultural |
| 45 | Personal |
After selecting a “class”, you will need to describe your products or services within that class. Here are some examples of product descriptions:
iPad Mini - Class 09 (Software and Electrical) - “Handheld mobile digital electronic device comprising a tablet computer, electronic book and periodical reader, digital audio and video player, camera, electronic personal organizer, calendar, and mapping and GPS device, and capable of providing access to the Internet.”
Etsy - Class 35 (Advertising and Business) - “Computerized online ordering featuring general merchandise and general consumer goods.”
Tumblr - Class 41 (Education and Entertainment) - Electronic publishing services, namely, publishing of online works of others featuring electronic media, multimedia contents, videos, movies, pictures, images, text, photos, user-generated content, and related information via the Internet; electronic publishing of blogs of others.
BOSE - Class 09 (Software and Electrical) - Loudspeaker systems; electrical power processors-namely, power amplifiers, inverters, and battery chargers.
What Class for Software? Picking the right class and description for software is difficult. Consider claiming software in several different classes:
| Class | Short Title | Example |
|---|---|---|
| 9 | Software (goods) | Any software that users download into a computer or mobile device. |
| 35 | Advertising and Business (services) | online advertisements, digital markets, database services, |
| 38 | Communication (services) | Internet service providers, cloud computing, chat & messaging services, streaming media. |
| 42 | Software (services) | “software as a service” and software development services. |
| 45 | Software (services) | Social networking, online dating |
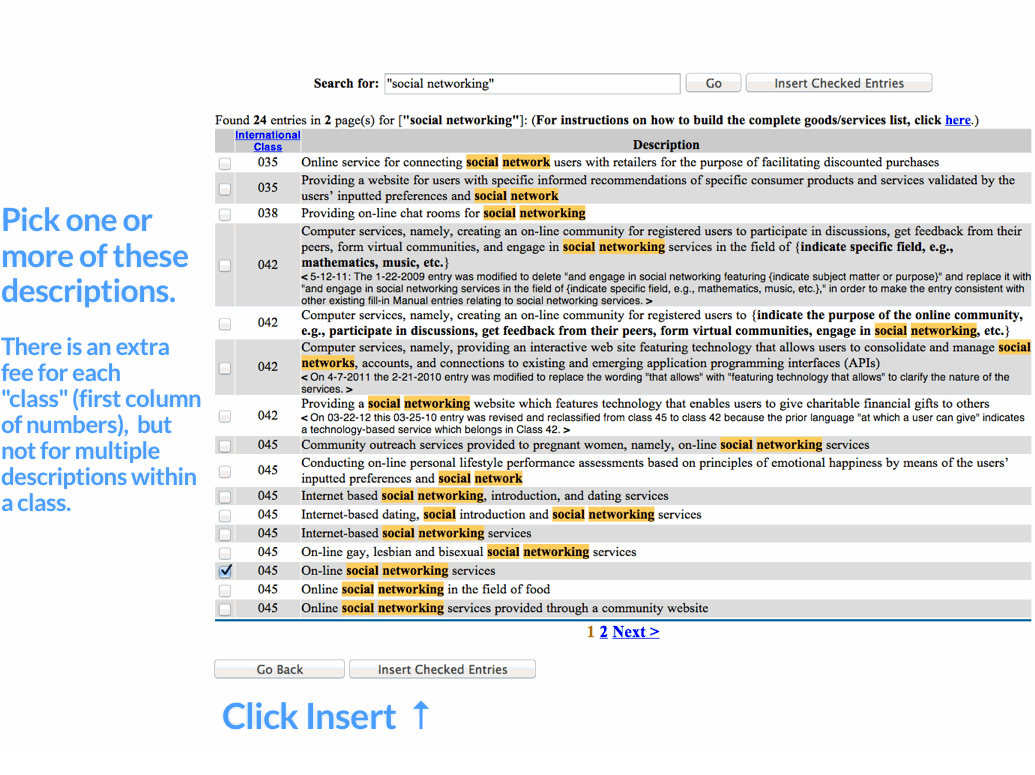
6. Selecting Goods and Services from the List
When viewing the search results, be sure the description is in the rights class (as listed in the left column). You can pick several descriptions, as long as they accurately describe your goods or services. The USPTO charges additional fees per “class” but not for multiple descriptions within a class.
7. Filing Basis
Every trademark needs a “filing basis.” The filing basis is just a reference to the part of the Trademark Statute you are claiming your rights under. The two filing bases we will discuss here are called “use in commerce” [§ 1 (a)] and “intent to use” [§ 1 (b)]. The others relate to international trademarks. See TMEP 806 for filing basis details, and TMEP 1101 for additional information about when a company has a bona fide “intent to use” a trademark in the future.
Pick § 1 (a) if you already use the trademark in interstate commerce. That is, you already use this trademark to sell some product or service in more than one US state.
Pick § 1 (b) if you don’t use the trademark to sell anything yet, but you plan to start soon.

If you selected § 1 (a) (use in commerce), you will need to provide a “specimen of use” – a jpg image showing how you use the trademark in commerce. This will be the next step.
If you selected § 1 (b), you will end up filing an “intent to use” application. This is a placeholder. It will not provide full trademark rights until you file a “statement of use” with the Trademark Office. There is a time limit. You must file the statement of use within 6 months after your intent-to-use registration issues. You can extend this deadline for up to 3 additional 6-month periods by paying extension fees. This guide does not cover the § 1 (b) intent-to-use trademark application process.
8. Specimen of Use
If you are already using your trademark (and picked § 1 (a) above), you need to upload a jpg image that shows how you use the trademark.

For physical goods, upload a picture of the trademark on the actual product. You can use a screen-shot of your website, but only if it shows a “buy now” or “Purchase” button.
the specimen must show the mark as used on or in connection with the goods in commerce. A trademark specimen should be a label, tag, or container for the goods, or a display associated with the goods. TMEP 904.03.
For services, upload an advertisement showing the mark being used to promote the service. TMEP 1301.04.
Software as a service and digital technology services require a very specific type of specimen of use. The TM Office’s August 2014 guidelines describe the details. For example, if your application claims software as a service, examiners will reject a specimen that they believe shows only “downloadable” software.
9. Upload the Specimen of Use
On this page, you will upload a jpg of your specimen of use. The image should be smaller than 900px square, but big enough to show the trademark being used to sell your product or service. Feel free to upload a few different images to help ensure the Trademark Office will approve at least one of them.
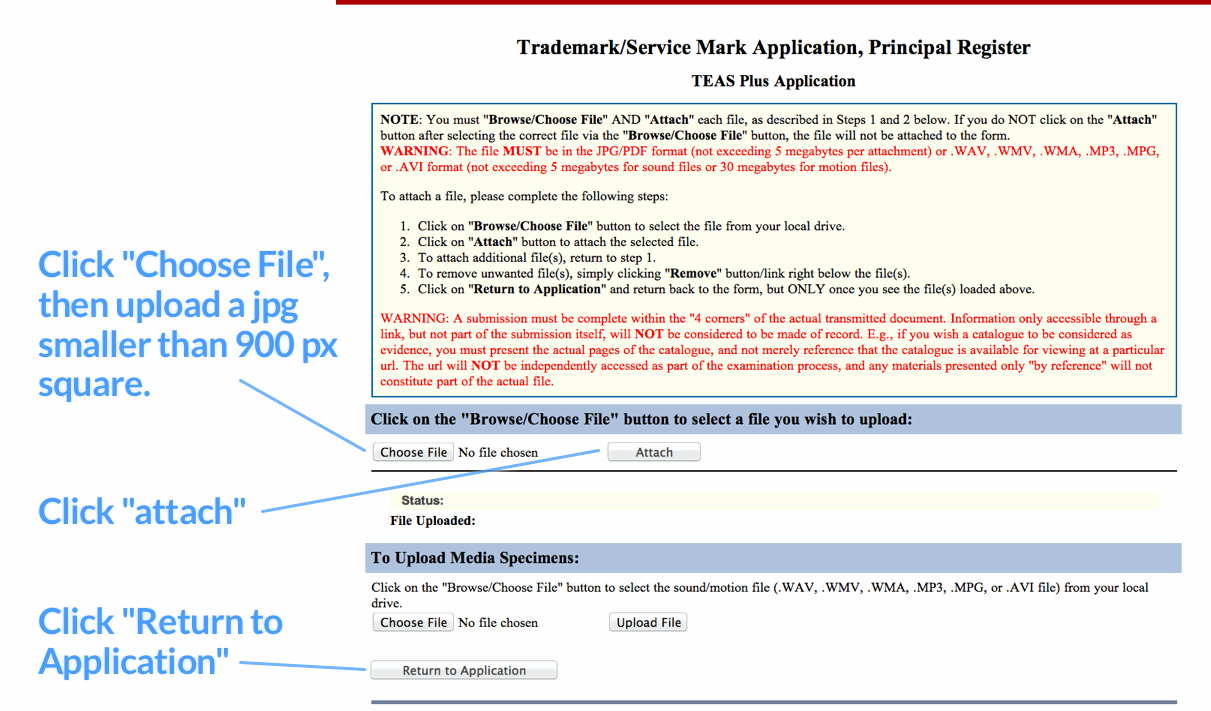
After you upload the image, click “return to application.”
10. Date of First Use
At this page you will enter the “date of first use” and describe the specimen image that was just uploaded.
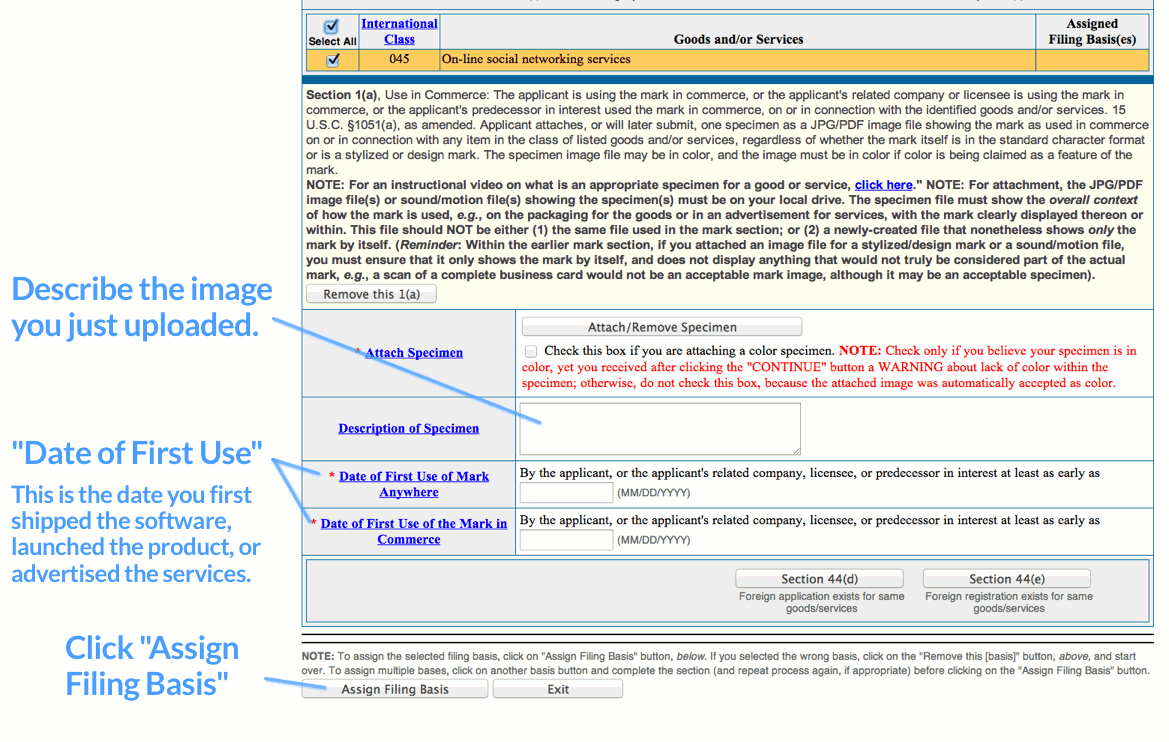
First, write a short description of the specimen image you just uploaded. The description can be something simple like “photo of product showing mark on tag.”
Next, enter the “date of first use” of the trademark. See TMEP 903 for details on the “Dates of Use.” There are two dates - first use in commerce, and first use anywhere. It’s critical that you get the date of first use in commerce correct. If you don’t know the exact launch date, input the month and year.
For goods in the same class, you can assign filing bases in a batch. If the goods are in different classes, each class needs to be assigned a filing basis separately.
Click “assign filing basis” at the bottom, and you will be returned to the “Basis for Filing” screen once again.
11. Back to the “Basis for Filing” Screen
After every line is assigned its filing basis (that is, there is a “1(a)” or “1(b)” shown in the far right column for each row), click continue.

You have now described your goods and services, and assigned a filing basis for each class. The final steps are easier. You need to enter your contact info, sign the application (swearing that its contents are accurate), and pay the USPTO fee ($275 per class).
12. Enter Contact Info
Enter the contact info for the person who should receive Trademark Office notifications related to this application. This may or may not be the same contact info you entered earlier for “owner info.”
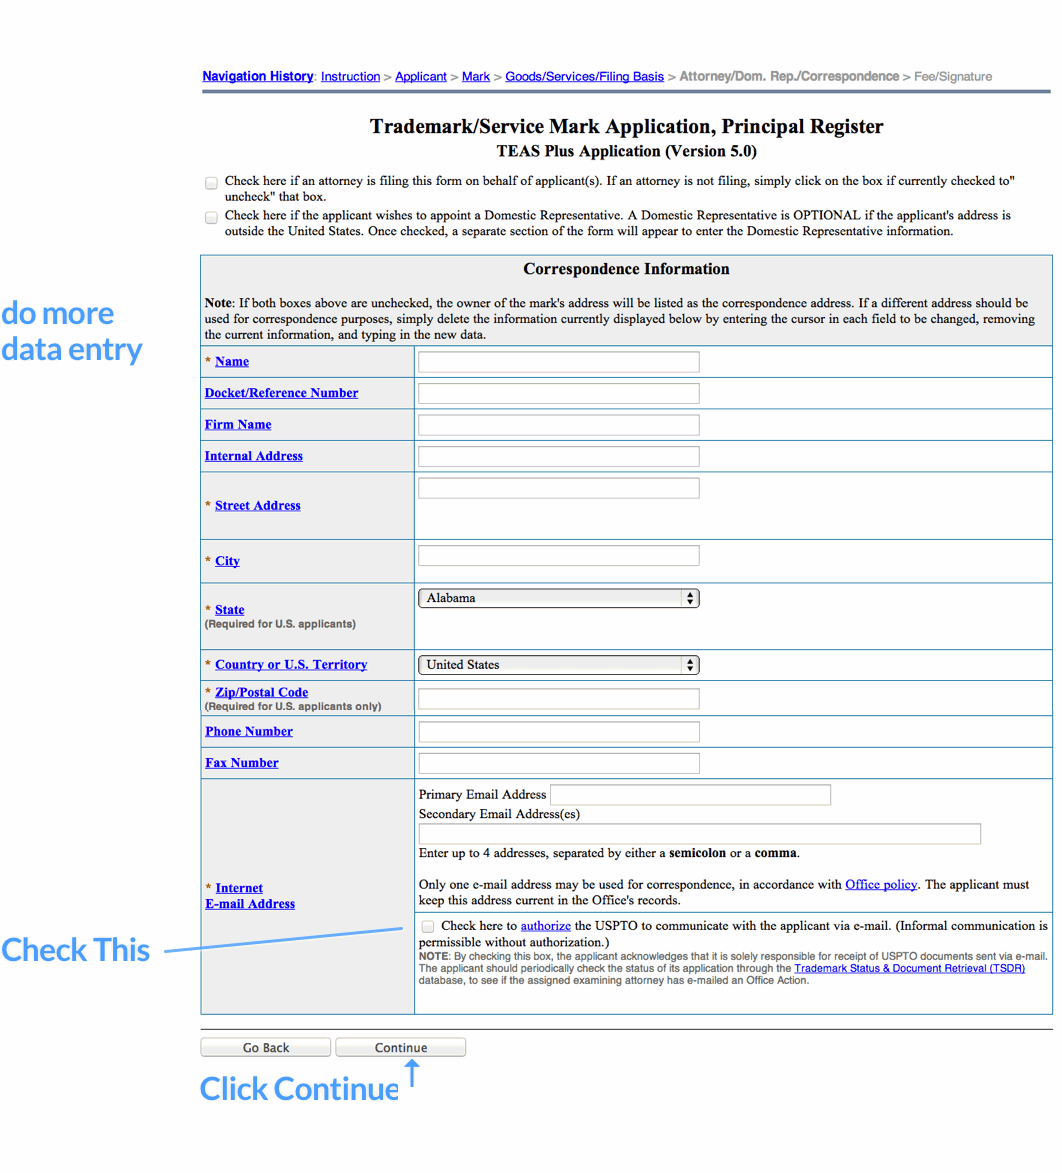
13. Sign the Application
The application must be signed by a person (a) with authority to bind the company filing the application, and (b) with firsthand knowledge that the facts in the application are true. TMEP 611.03 discusses who can sign a trademark application.
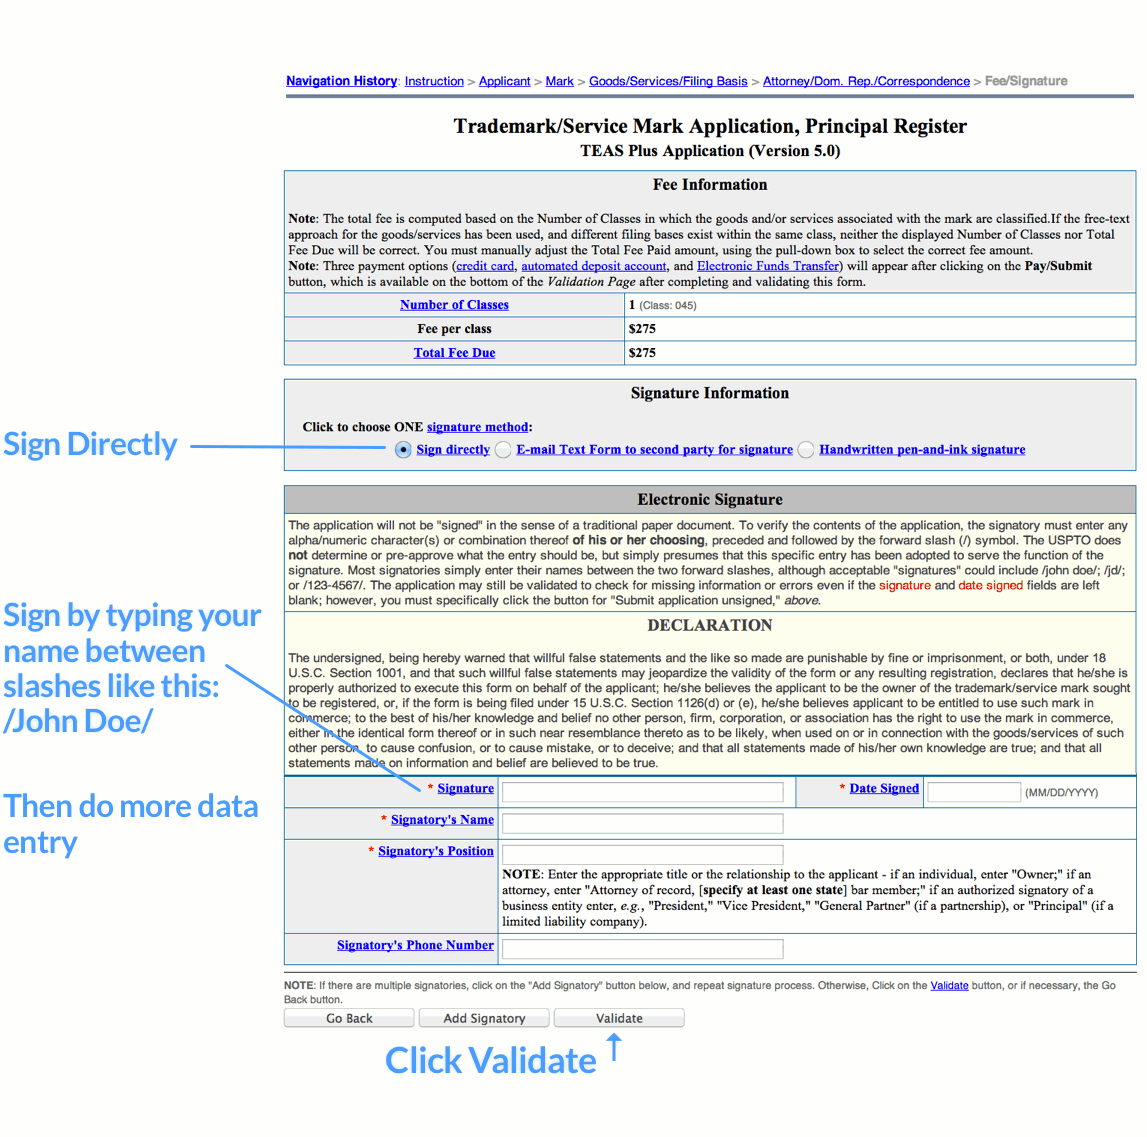
Pick the “sign directly” radio bubble. Then sign your name in the “signature field” by typing it between two slashes like this: /Osbert Sitwell/. By signing the declaration, you are swearing that everything you just wrote is true.
Click “Validate”. Don’t click “add signatory” unless you want to add a second signer.
14. Click to Agree
Enter your email again, and then click to agree to the terms. The Trademark Office fee is non-refundable, and any info you send will become public information (except credit card).

15. Pay the Filing Fee
Submit payment and you’re done.
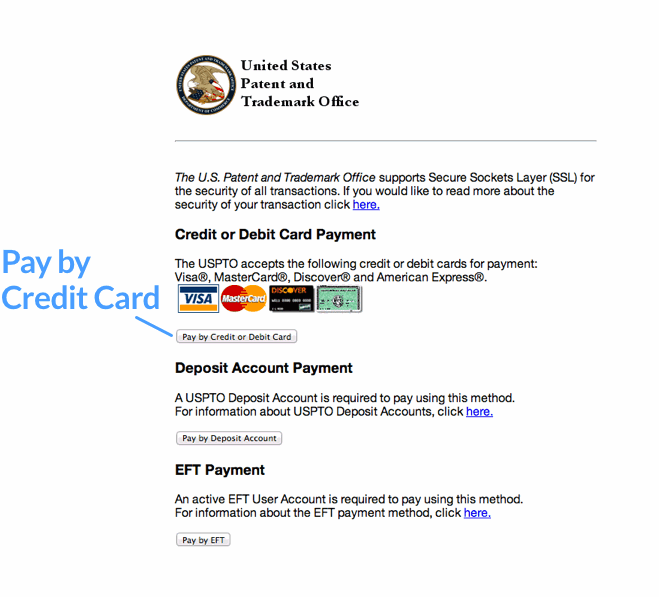
What to Expect After You Submit
The USPTO sends an immediate confirmation email. Then, about 3 months later, a Trademark Examining Attorney will review your application and send you an “office action.” If the office action is an approval, your trademark will probably register in 2 more months, and the Trademark Office will mail you an official document with a shiny gold seal.
If the office action is a refusal, you will receive an email explaining the reasons for the rejection. You will have 6 months to respond to the refusal by either amending the application or pointing out any errors in the Trademark Office’s reasons for rejecting the application.
Conclusion
Filing a DIY trademark application risky. Reading a blog is not a substitute for hiring an experienced trademark attorney.
-
Do Trademark Lawyers Matter? Stanford Technology Law Review (2013). ↩
-
While word-marks and design-marks are the most common types of trademarks, there are really several other types of marks that can be registered, including sounds, product packaging, colors, and animations. ↩
-
There is a separate “US Classification” system, but it’s essentially irrelevant, even for a US trademark application. ↩